Follow RNRMarine™ on Twitter® Logo Image RNR-Marine™ on YouTube® Image See RNR-Marine-Inc.™ on LinkedIn® Image
To find factory OEM & custom fit canvas, tops, covers & carpet, enter:
Manufacturer:
Boat Model
:
RNR-Marine™, Inc has Factory Original-Equipment (OEM) Canvas for 1,000's of boats and manufactures the T-Topless™, Montauk-T-Topless™, Shadow™, Montauk-Shadow™ and Flats-Top™ folding and removable tops for Center Console and Flats Boats
(c) RNR-Marine, Inc.

10/25/24 RnR Marine™ Status:

Covers and Carpet
  New, Factory OEM OVERSTOCK (Save 25-75%): OVERSTOCK for:
    Sea Ray, Whaler, Regal, Malibu, Mastercraft & Cobalt
OVERSTOCK for:
    Chaparral, Rinker, Larson, Formula, Robalo & Trophy

  Please SEARCH by boat Model at the top of the page for  
      factory Original Equipment Manufacturer (OEM)
      Canvas, Curtains, Frames and Covers...

TTopCover™ Under T-Top or Hard-Top Boat Covers T-Top Mooring/Storage Curtains Carver® Custom-Fit™ Trailerable Boat Covers for 1,800+ boats Carver® Styled-To-Fit™ Trailerable Boat Covers for 15,000+ boats Carver® Center Console Boat Covers LaPortes® Center, Dual Console & Flats Boat Covers Laportes® Custom Trailerable, Center Console (No T-Top) Boat Covers Carver® Over T-Top or Hard-Top Boat Covers Carver® Under Wakeboard-Tower Boat Covers Carver® Over Wakeboard-Tower Boat Covers Carver® Flats-Boat with Poling-Platform Covers Universal Console Covers, No T-Top Universal Leaning-Post Covers Universal Reversible (Flip-Flop) Seat Covers Carver® Zippered Sunbrella® Bimini Boot Cover Snap-In-Carpet™ Mat Set   Motorcycle covers (Winter 2021)
  Snowmobile covers (Winter 2021)
  Golf Cart covers (Winter 2021)
  ATV covers (Winter 2021)
  UTV covers (Winter 2021)
  Sport UTV covers (Winter 2021)
  Snowmobile covers (Winter 2021)
  RV covers (Winter 2021)
  Carver® PWC covers (Winter 2021)
  Kayak covers (Winter 2021)
  Canoe covers (Winter 2021)

  Please SEARCH by boat Model at the top of the page for  
      factory Original Equipment Manufacturer (OEM)
      Bow, Cockpit, Mooring, Top, Seat and Dash Covers...

TRACK your Order
Tops
Measure Center Console Boat for T-Topless™ or Montauk-T-Topless™ T-TOP Stretchy Shade Extension Kits for center console boat's Bow or Aft Cockpit T-Shade™ Rigid Shade Extension Kits for center console boat Cockpit HARD-TOP Shade Extension Kits for Walk-Around, Express or Dual Console boats BIMINI Shade Extension Kits for most Bimini Tops Carver® Aluminum Bimini Top (UnAssembled) Carver® Stainless Bimini Top (UnAssembled) Carver® Stainless Sunbrella® Bimini Top (Assembled) Carver® Pontoon Bimini Top Carver® Under Wake Tower Top NEW! Fishini™ Bimini-Top Replacement 3 Round Bow Carver® Bimini-Top Canvas & Boots Replacement 4 Round Bow Carver® Bimini-Top Canvas & Boots Carver® Replacement Pontoon Top Canvas & Boots (with Light Cutouts) Carver® Zippered Sunbrella® Bimini Boot Cover
  Please SEARCH by boat Model at the top of the page for  
      factory Original Equipment Manufacturer (OEM)
      Tops, Frames, Canvas and Covers...

T-Tops Comparison Compare to the Competition
T-Topless™ folding T-Top photos & images Montauk-T-Topless™ folding T-Top photos & images Shadow™ folding T-Top kit photos & images Montauk-Shadow™ folding T-Top kit photos & images TTopCovers™ T-Top boat cover photos Videos TRACK your Order
Customer Service

T-Topless™ & Montauk-T-Topless™ Installation Steps

Note - A complete, illustrated "Installation Guide" will be sent with your top.
  • Carefully unpack your T-Topless™/Montauk-T-Topless™ (20 minutes):
    1. Do NOT cut through the box, as the Sunbrella® canvas is packed in the box!
      T-Topless™ and components in open box
      T-Topless and components (instructions, light lens, clamps & wiring harness) in box.

  • Install the T-Toplesss™/Montauk-T-Topless™ (30-45 minutes):
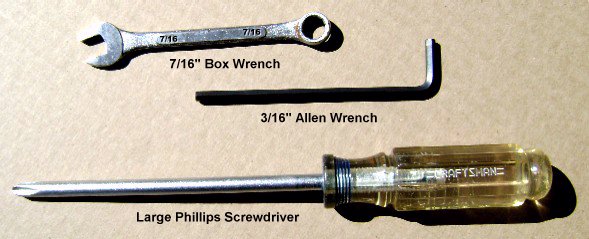
    1. You'll need a 5/6" Hex Wrench, a Medium Phillips Screwdriver and a 7/16" Box End Wrench
    2. Lay top upside down on padded cooler in front of boat, with legs facing up, such that the leg's lower pivots are near the top of the windshield grab rails,
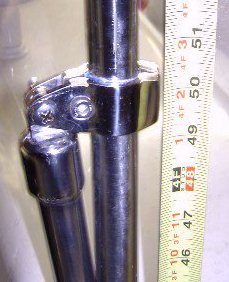
    3. Install front clamshell "Split Jaw Slides" on windshield grab rails, approx, 50-55" above floor using 3/16" hex wrench,
    4. Align front legs into pivot point on these Split Jaw Slides and insert 1/4-20 bolts and nuts using Phillips screwdriver and 7/16" box end wrench,
    5. Install rear legs pivots on rear windshield grab rails, or deck-hinge fittings attached to rear of console,
    6. Rotate top up carefully and align rear legs with these fittings,
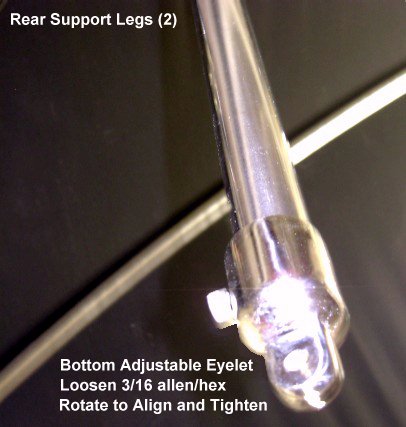
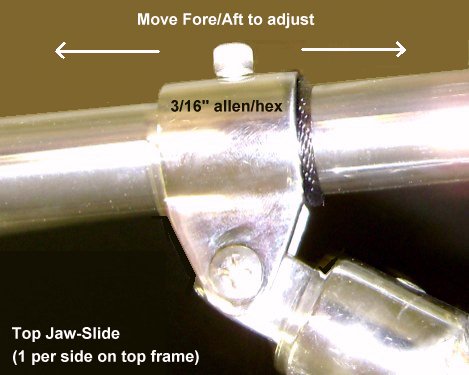
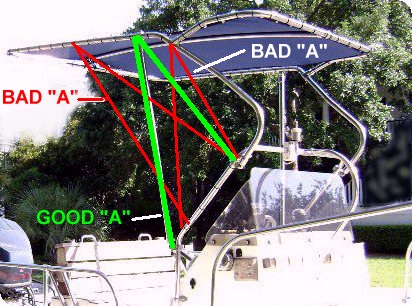
    7. Adjust jaw-slides on frame at top of Rear-Legs fore/aft and clamp-on split-jaw-slides at bottom of Rear-Legs up/down in order to level the top and produce a stable, wide-based "A" shape.
Tools Fittings Front Pivot x Top Slide A shape
  • Carefully unpack your T-Topless-2™/Montauk-T-Topless-2™ (20 minutes):
    1. Do NOT cut through the box, as the Sunbrella® canvas is packed in the box!
      T-Topless-2™ and components in open box
      T-Topless-2 and components (instructions, light lens, clamps & wiring harness) in box.

  • Install the T-Toplesss-2™/Montauk-T-Topless-2™ (30-45 minutes):
    1. You'll need a 5/6" Hex Wrench, a Medium Phillips Screwdriver and a 7/16" Box End Wrench
    2. Lay top upside down on padded cooler in front of boat, with legs facing up, such that the leg's lower pivots are near the top of the windshield grab rails,
    3. Install front clamshell "Split Jaw Slides" on windshield grab rails, approx, 50-55" above floor using 3/16" hex wrench,
    4. Align front legs into pivot point on these Split Jaw Slides and insert 1/4-20 bolts and nuts using Phillips screwdriver and 7/16" box end wrench,
    5. Install rear legs pivots on rear windshield grab rails, or deck-hinge fittings attached to rear of console,
    6. Rotate top up carefully and align rear legs with these fittings,
    7. Adjust jaw-slides on frame at top of Rear-Legs fore/aft and clamp-on split-jaw-slides at bottom of Rear-Legs up/down in order to level the top and produce a stable, wide-based "A" shape.
Tools Fittings Front Pivot x Top Slide A shape

How to lace canvas on your T-Top Lace canvas on top Lace canvas on T-top Lace canvas on Shadow Lace Sunbrella on T-Top Lace Sunbrella on Shadow T-Top Lace a boat T-top cover Lacing canvas on top Lacing canvas on T-top Lacing canvas on Shadow Lacing Sunbrella on T-Top Lacing Sunbrella on Shadow T-Top Lacing a boat T-top cover

  • Lace the Canvas (30-40 minutes):
    1. If the top is off the boat, position the top so you can reach both sides easily, by positioning the top:
      • hanging in the air vertically from one end or a side,
      • in place on the boat (working over your head can be tiring however), or
      • with the end of the top on a table so you can reach underneath.
    2. Attach the canvas loosely using 6 to 8 "zip-ties" pulled through grommets near the corners and around frame. Once lined up, tighten, but not too tight.
    3. Start in the center at the front (if possible) (Front/Middle on most T-Tops, T-Topless™, Montauk-T-Topless™ & Flats-Top™; Rear/Middle on the Shadow™ & Montauk-Shadow™),
    4. You want to end up with the lacing running under the canvas between grommets in order to turn the edges of the canvas down to shed water,
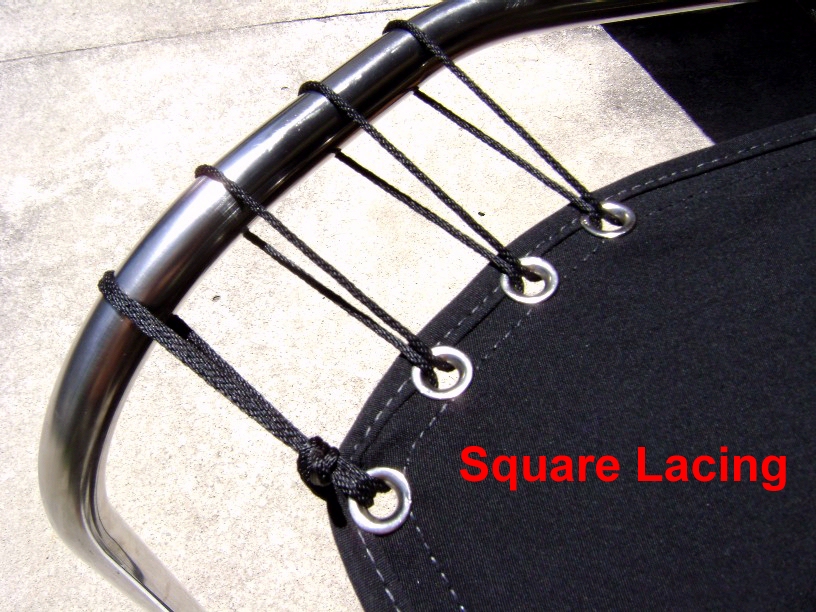
    5. Lace the canvas to the frame (important to reverse over/under from left to right side to avoid kinking):
      1. Lace to the Left:
        1. Start lacing through the TOP of 1st grommet,
        2. Run lacing under canvas and up through the next grommet to the Left,
        3. Run lacing UNDER frame tubing and OVER the top of the frame tubing,
        4. Run lacing back through the TOP of same grommet,
        5. Repeat at the next grommet to the Left until finished,
      2. Lace to the Right (reverse under/over bar sequence):
        1. Start lacing through the TOP of 1st grommet at the center,
        2. Run lacing under canvas and up through the next grommet to the Right,
        3. Run lacing OVER frame tubing and UNDER the top of the frame tubing,
        4. Run lacing back through the TOP of same grommet,
        5. Repeat at the next grommet to the Right until finished.
    6. Pull all canvas lacing tight,
    7. Adjust lacing to center the canvas in the frame side-to-side and fore-and-aft,
    8. Pull all canvas lacing tight, but do NOT over-tighten! The canvas should have a snug fit with the edge having a smooth straight appearance. Do not over-tighten to the point of "smiley's" between grommets (this may void your warranty),
    9. Loop the "tag ends" through the last eyelet at each end 2 or 3 times,
    10. Tie the ends in a bow, then tie the loops of the bow in a square knot,
    11. Cut the loose "tag ends" of the lacing to about 3" and burn the ends to prevent unravelling.
    12. Weave these "tag ends" into the lacing for a finished look.
Square Lacing on Shadow™
Square Lacing shown on Shadow™ Folding T-Top
  • Install Light Wiring (15-45 minutes):
    1. Locate or drill a hole through the console to pull the jacketed wiring pig-tail (included) through to inside your console,
    2. Pull the wiring pig-tail through,
    3. Behind your dash, locate the wire that feeds the Anchor (ANC) and Navigation (NAV) white light (typically Grey or Blue with a Black Stripe) and attach the Red (+) wire to it, ref: American Boat and Yacht Council Wiring Standard Colors & Use,
    4. Attach the Black (-) wire to ground (possibly the tachometer center bolt),
    5. Connect the top's wires to the lead through the splash-proof pin-connectors already attached to the the cables,
    6. Zip tie the jacketed wires along the windshield grab rail with zip ties (included) and trim them flush, providing some room at the top to fold the top down without pinching the wires.


TRACK your RNR-Marine™ order: Email Address:


RNR-Marine™ Products are Made in the USA, Image
RNR-Marine, Inc. is Verified by PayPal's Verification Seal Image
Sponsor, TheHullTruth.com
Sponsor

Privacy   |   Customer Service
Some photos show optional items mounted on standard products. Descriptive, typographical or photographical errors are subject to correction. Valid HTML 4.01 Transitional Valid CSS! 52.14.75.147 ,

Install your T-Toples in an hour How to install your T-Topless Its easy to install your T-Topless

Ontario British Columbia BC Alberta Newfoundland Saskatchewan Manitoba Quebec New Brunswick Novia Scotia Labrador ALABAMA AL ARIZONA AZ ARKANSAS AR CALIFORNIA CA COLORADO CO CONNECTICUT CT DELAWARE DE DISTRICT OF COLUMBIA DC FLORIDA FL GEORGIA GA IDAHO ID ILLINOIS IL INDIANA IN IOWA IA KANSAS KS KENTUCKY KY LOUISIANA LA MAINE ME MARYLAND MD MASSACHUSETTS MA MICHIGAN MI MINNESOTA MN MISSISSIPPI MS MISSOURI MO MONTANA MT NEBRASKA NE NEVADA NV NEW HAMPSHIRE NH NEW JERSEY NJ NEW MEXICO NM NEW YORK NY NORTH CAROLINA NC NORTH DAKOTA ND OHIO OH OKLAHOMA OK OREGON OR PENNSYLVANIA PA RHODE ISLAND RI SOUTH CAROLINA SC SOUTH DAKOTA SD TENNESSEE TN TEXAS TX UTAH UT VERMONT VT VIRGINIA VA WASHINGTON WA WEST VIRGINIA WV WISCONSIN WI WYOMING WY